The Bobber Stop knot can come in pretty handy if you want to adjust the depth to which you would like your bait to remain, especially if you are fishing for panfish or walleye, and if you are ice fishing. The thing I want about this fishing knot is that it can pass through the eyes of the fishing rod easily.
Once the bait reaches desirable depths, the slip bobber can slide up the line till it reaches the knot.
Tying the Bobber Stop Knot

Step 1
Lay the stopper line against the fishing line you are using, and right at the point you have chosen and double back to create a loop.
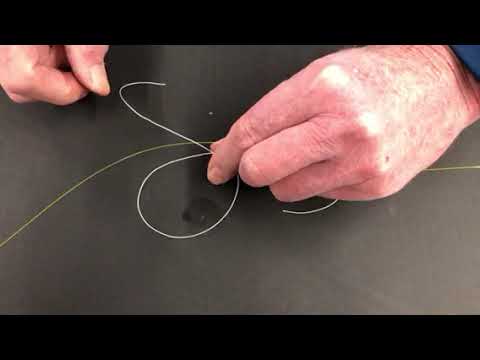
Step 2
Hold the part of the loop where the stopper line crosses over itself and the line.
Step 3
Make 2 to 3 turns around both and pass through the loop every time.
Step 4
Pull the two ends of the line in opposite directions to tighten the knot and secure it in place. The number of bobber stops you make when you are making the knot is up to you.

Tips
- Does Bobber Stop knot keep getting loose? To prevent the Bobber stop from getting loose, don’t make it too small. You can buy these if you get frustrated, but that will defeat the purpose.
- The best line to tie the Bobber Stop knot is a monoline or Dacron.
- Make several Bobber Stop knots ahead of your fishing trip and make them out of discarded braid tag ends to save the line. These can loosen when they get wet, so you will spend more time re-rigging than catching fish if you are unprepared.
- The best bobber stop knot is made from a line that is wrapped around a small plastic tube.
- The Bobber knot should be made of about 6 inches of line.
Uses
- The Bobber Stop knot provides a moveable point that prevents a float from sliding along the mainline. If you use flexible mono to tie it, it can cast through the rings of any rod.
- The Bobber knot is quite useful for anglers who want to catch Bream and Shellcracker since its depth is easy to adjust.
Advantages and Disadvantages
The Bobber Stop knot is tied to the mainline and comes in handy when the angler wants to slide the bobber up and down to achieve accurate bait depth. One downside of the Bobber knot is that it tends to loosen when it gets wet.
Alternatives
- Non-slip Loop Knot – This knot makes a sturdy fixed loop at the end of a line.
- Palomar Knot – This knot is ideal for a range of light lines, especially the braided variety.
FAQs
This is a versatile knot that is used to trap a swivel and a bead in a trapped swivel rig.
These are mounted on a looped wire and are used to hold a loaded float in place.
 Founder & Angler

 Facebook
 YouTube


