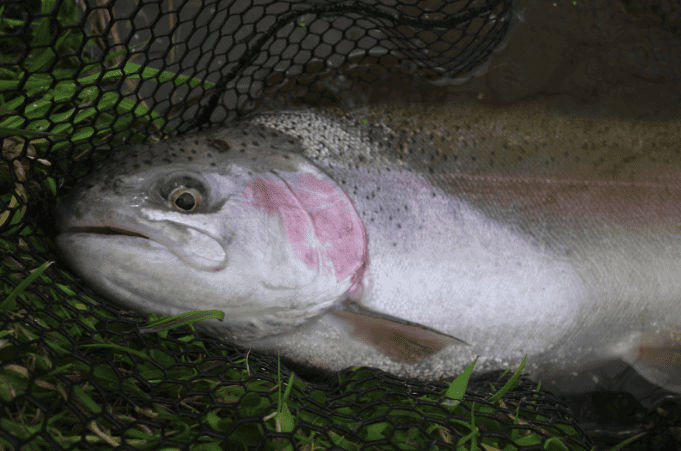
After a long day of fishing, your efforts have paid off, and you’ve come out with a load of fresh trout. The first thing that is likely to cross your mind is, ‘now is the time to enjoy the fruits of my hard labor.’
But, before your trout gets into the frying pan, it needs a thorough cleaning.
Cleaning helps to remove the inedible parts and entrails from the fish. This way, it is ready for cooking or storage.
The process of cleaning trout is simple yet delicate. This article aims to guide you through the process step-by-step to ensure you don’t miss any detail.
Let’s get started…

How to Clean Trout: A Step-by-Step Process
Cleaning trout right after fishing them is the surest way to ensure the catch remains fresh.
Once the trout is out of the water, it dies and begins to decompose almost immediately. For this reason, you need to remove its internal organs and digestive juices as soon as possible.
Here is how to clean a trout fish effectively:
Step 1: Make the Initial Cuts for Cleaning
- Rinse Your Trout Fish and Lay It on Its Side
Hold the fish under running water to remove dirt and slime. Then, lay it on a flat cutting surface such as a chopping board, table, or counter. Use the back of your car if you don’t have a table handy or are not in a home environment.
Position the fish sideways, with the bottom side facing you. However, remember cleaning fish is messy. Therefore, consider placing a butcher paper or plastic table cover on your work surface to ease cleanup.
- Slit the Trout Up from the Anus, Through the Belly to the Throat
Insert the tip of your knife into the anus and run it along the length of the fish towards the head. Cut in a straight line. Stop a few inches before you reach the head, preferably when the knife evens with the gills.
Do not cut too deeply into the fish, as a deep cut can puncture the intestines, causing them to release the food that was undergoing digestion in the fish. Therefore, a foul odor could be a sign of ruptured intestines.
Ruptured intestines expose the meat to bacteria and enzymes, which can cause it to spoil faster and make it unsafe to eat. If this happens, rinse off the digested matter immediately and thoroughly.
- Separate the Gills from the Head
Run your knife through the skin connecting the head and the curving base of the gills.
- Pierce the Underside of the Jaw with a Knife
Hold the fish upright and stick your knife on the jaw below the lower lip. Push the blade gently until it penetrates the other side.
Please note that the skin around the fish jaw is tough. Therefore, use a back-and-forth motion to work the blade through.
- Cut Through the Jaw, Towards the Mouth
Apply enough force to guide the knife’s blade through the jaw tissue.
You will notice that a small flap beneath the mouth is left hanging. This opening will come in handy when removing the entrails.
- Insert the Knife into the Exit Hole
Flip your trout over to expose its belly. You will see the exit hole near the tail end under the lower fin.
Position the blade towards the head and slide it in gently. Ensure that your filleting knife is sharp and flexible to speed up the dressing process and make precise cuts.
Remember that you will touch a lot of blood in the process. So, it is recommendable to wear rubber gloves.
Step 2: Remove the Entrails, Fins, and Head
- Insert One Finger Through the Jaw
Position the trout with the belly facing upwards and the head pointed upwards. Doing so will open the jaw flap.
Insert one finger into its mouth and push it towards the jaw flap to extend the v shaped point. However, be cautious because the fish has sharp, pointy teeth, which you must watch out for.
- Remove the Intestines
Hold the jawbone firmly with the tips of your forefinger and thumb. Then, grip the fish with your other hand.
Then, pull down the jawbone in one pull to tear the v shaped point. The entire lower jaw and abdomen will come out freely in one piece. These include the gills, guts, and intestines.
The jawbone method is straightforward and saves you the trouble of removing the entrails by hand. But you should handle the intestines with care to avoid tearing them.
When you are done, put any loose entrails in a Ziploc plastic bag before discarding them to avoid attracting flies.
- Scrape Out the Kidney/Bloodline
Now that the entrails are out of the way, spread the fish open. Search the inside, and you will see a dark red line behind the backbone.
Drag a fingertip along the groove to clear out the gunk. This way, you can see the connective tissues clearly.
Detach the firm connective tissues with your finger, then cut along the kidney’s length with a knife. Scoop them out with a spoon or fingers.
If the membrane holding the bloodline is too firm, use a toothbrush to break it up.
- Cut off the Head and Fins
Cutting the head is not mandatory. You can still store your fish with the head attached. However, cutting off the head eases storage and saves on space.
Remember the initial cut you made for the gills? Insert your knife right there until the head falls off. Grip the dorsal fin firmly and make a shallow cut along the top side of the fish to remove it.
After removing the fins and head, your fish is ready for skinning and filleting.
- Rinse Your Trout Fish Thoroughly
Flush the body cavity of your fish with cool water to remove any remaining tissues, blood, and dirt.
Place your cleaned fish on a layer of paper towel to absorb excess water. To further disinfect your trout, scrub the inside and out with a soft-bristled brush and distilled white vinegar.
Step 3: Skinning and Filleting the Trout
- Remove the Tail
Insert the knife at the exit hole where you made the initial incision, directly behind the gill line. Then, slide the knife until you reach the backbone.
Guide the knife along the backbone, through the ribs, to the tail. Repeat the same cut on the opposite side of the trout. Once you reach the tail, stop. Do not cut the tail off immediately, as it will provide grip when skinning the fish.
- Separate the Fillets from the Backbone
Lay your trout flat on a cutting board, with the backbone facing you. Then run your knife along the spine towards the fillet. Once the first fillet is out, set it aside.
Flip the fish and repeat the same cut with the other fillet.
Cut long, smooth strokes instead of short, jagged ones. This way, you will waste less meat and get cleaner fillets.
- Trim the Fillets
You will likely see white cartilage and fat traces on the points where fillets were attached to the backbone and belly.
The only way to remove these extra tissues is by trimming them with a knife.
These tissues are chewy and hard when cooked. They don’t match the soft, velvety texture of fish. So, ensure you do a thorough trimming job.
- Remove the Pin Bones and Rib Cage
A pair of tweezers does an excellent job plucking out the tiny pin bones.
Squeeze the tweezer on the meat to get a good grip on the bone tip. Once you get hold of the tip, pull it, and the whole bone will slide out of the rib cage.
- Remove the Skin and Scales
Lay the fillets flat, with the skin facing down. Then insert your knife lightly into the meat and away from the tail.
Run the knife along the skin, careful not to cut through it, and cut the tail once the skin is off.
Unlike most fish, it is not mandatory to remove the skin of a trout before cooking. In fact, most people prefer to eat rainbow trout with skin for extra crispiness and flavor.
Step 4: Preservation and Storage
- Preserve Your Fish on Ice
Immediately after fishing, place your fresh catch in an ice-filled cooler. Many anglers keep a cooler handy as keeping the trout cold slows down decomposition.
Remember to drain the cooler from time to time and replace the ice to keep the fish fresh. If you are on the water all day, put your trout on a stringer and pull it alongside the boat.
- Store Your Cleaned Trout in a Freezer or Refrigerator
Wrap your dressed trout in wax or plastic bags and stash it in the lower drawers of a refrigerator at a temperature of 32 degrees Fahrenheit or below.
Keep your frozen fish at 0 degrees Fahrenheit.
If you are freezing your fish, vacuum seal it first to protect it from freezer burn. This process can also prolong the shelf life of your catch to three or four months.
Always double wrap your fish when storing it in the refrigerator to prevent leakage of the fishy odor. Also, ensure that you squeeze out excess air from the storage bag.

Related Questions
Yes, cleaning trout immediately after fishing is recommendable as it slows down the decomposition of the internal organs.
Consider cleaning your trout before cooking to remove slime, entrails, and all other inedible fish parts.
Slit the trout open, remove the intestines, cut off the inedible parts, then fillet and skin it. Wash the trout thoroughly and cook as you wish. You can fry, bake, grill, or boil it.
The cleanup process is long and tedious to beginners, but once you master it, it gets easy.
Conclusion
Many anglers can confirm that the freshest fish you will ever eat is the one cooked immediately after catching it.
However, you need to take some time to clean it and prepare it for the frying pan. Cleaning trout is an art. It gets easier the more you practice it.
 Fishing Expert
  Facebook
 YouTube